|
Peek's Pike was designed
to be fast and easy for a beginner to build, at moderate cost and using minimum space.
It illustrates most of the advantages of micro layouts ... and offers some new ideas
as well. Let's start by taking a look at the track plan.
This plan may look a little odd
to you. Parts of the trackage seem unconnected from the rest; there's a fuzzy grey
area at the right called "Fiddle"; and the whole thing doesn't look very
much like a railroad! Let's look closer.
First, There are three industries listed on the plan -- a brewery, a cooperage, and
an electrical goods dealer. A scrap dealer looks like he's in the future plans as
well. The time setting for this little road is 1934, the place is a generic American
town near where you grew up. Prohibition has just recently been repealed, and the
brewery business is booming. So is the cooperage business, which supplies the barrels
for the beer!
The main job of this little narrow-gauge railroad is to transport barrels from the
cooperage to the brewery, and then haul the beer away to the offstage interchange
with the Big Railroad. Peek's PIke was about to go under in the Depression,
when the repeal of Prohibition -- and the road's fortunate location connecting cooperage,
brewery, and Big RR interchange -- saved the day. In fact, a nearby electrical goods
dealer also asked the PPRR to bring him supplies and haul away his products, which
was a bonus that put the road solidly in the black.
Notice that there are no curved tracks on this road. All track is straight -- which makes
it very easy for a beginner to lay the rails accurately. And coupling or uncoupling will be simpler
and more consistent.
WHAT'S THE 'FIDDLE' ALL ABOUT?
"Fiddle" or "Fiddle
Yard" is a British term for the hidden part of a layout where cars and locos
are "fiddled" by hand to make up new trains and get ready to reenter the
visible part of the layout. It's the "secret weapon" that makes micro's
such good operating layouts. In effect, it represents the "rest of the world",
the offstage part of the line that we can't see.
The Fiddle Yard here also has an extra attraction. We're going to use a Peco Loco
Lift as an operating cassette. Here's what it looks like:
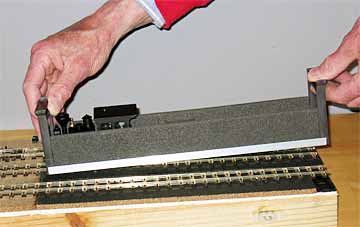 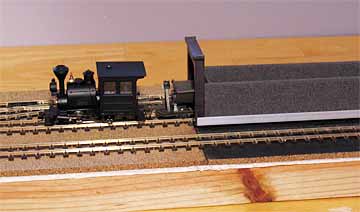
Although it's made for HO-sized
trains, the Loco Lift will easily hold a two or three car train plus locomotive in
On30 scale. As shown at left, it can simply be laid on top of the rails of the straight
track in the Fiddle Yard. Grooves in the bottom of the Loco Lift fit snugly onto
the rails and carry electrical current to the train, which can then be driven out
onto the layout to continue operating (shown at right). While the train is on the
Loco Lift, it can be reversed, moved from track to track, etc. -- all without touching
the stock and with no hassles! This is the heart of the amazing operating flexibility
of Peek's Pike! [Loco Lift Cost: $15. They're listed in Walthers
Catalog. All prices in this article are in US dollars.]
MAKING YOUR BASEBOARD
So let's get to work. First
thing to do is to make the baseboard.
The baseboard is foamcore board from an arts supply store. Foamcore is a very lightweight
art board that has foam in the middle sandwiched between two layers of heavy paper.
It's surprisingly sturdy and even nearly waterproof! One 30x40 inch board of 3/16"
foamcore will take care of your needs for Peek's Pike. However, you may want
to get fancy, as I did, and make your staging -- the front stage opening and wings
-- from a sheet of black foamcore, which looks quite elegant. A 20x30 inch sheet
will do.
[Foamcore Cost: 30x40 inch x 3/16 board, $8. 20x30 inch x 3/16 black board,
$5. Total: $13.]
As I built it, Peek's Pike is one meter long and 21 cm wide. In U.S. units, it's
39 inches by 8-1/4 inches. You may want to adjust these dimensions to fit your space,
and perhaps to hold a little more track for extra switching opportunities. By all
means, do so ... just make sure you make those adjustments before you start
cutting the foamcore!
Use a sharp craft knife to do your cutting To make my design, you'll need one piece
that's 39 inches long and 8-1/4 inches wide, or thereabouts.That's the base for the
layout. Now cut two side rails, each 1.5x39 inches, and four cross rails, each 1.5x7-7/8
inches. (Note that I used wooden lattice, 1.5 inches wide, for my side rails. This
is because I plan to take Peek's Pike with me to make presentations around
the country, and I need extra strength during transport. For normal home use, you
can use all-foamcore rails, which are much lighter.)
To glue, lay the baseboard, bottom up, on the table. It's a good idea to put some
old newspapers underneath, especially if you're using the good dining room table
to glue on!
Use a hot-glue gun to assemble the baseboard. (What? You don't have a hot-glue gun?
Get one immediately at any nearby discount store. They're useful for hundreds of
household repairs, and are so widely used that I'm not even going to count the cost
in our layout tabulation!) Start with one 39-inch side rail. Hold it in place, standing
upright on edge from the baseboard. Run a bead of glue along the joint between rail
and baseboard. Hold for a count of three. Okay, that's in place -- solidly and long-lastingly!
Next mount a cross-rail on the end of the baseboard, joining the side rail at a right
angle. Again, run a glue bead along the joint line. Do the same with the second 39-inch
side rail and the opposite end's cross rail. Put the other two cross rails between
the side rails, 10 inches from each end. They provide extra bracing for the top,
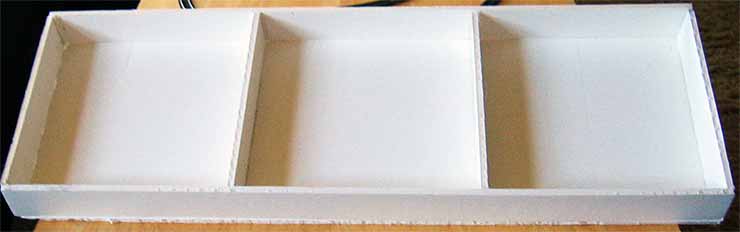
so it won't ever sag. And that's it. Your baseboard is complete. It will look something
like this. Should take about 1/2 hour to build.
LAYING YOUR TRACK
All track is Peco On trackage...
three 3-foot lengths of flex track and one each of left and right turnouts.
[Track Cost: I got my trackage on sale. Turnouts were $12.80 USD each, and
flex track cost $3.50 per 36" length. So total Track Cost was $36.10. You may
be able to do even better with a little careful shopping!]
As all tracks are straight, putting them down is just a matter of cutting the flex
track to length (with a razor saw or track nippers), attaching the lengths to the
turnouts using rail joiners, and gluing down the whole thing. Before you start
gluing, be sure to check the next section about the two insulating rail joiners that
are needed between the two turnouts!
Use Elmer's white glue (or equivalent). You can 't really use hot glue, because you'll
need some "wiggle time" to make sure the track is aligned properly before
you leave it in place for good. Follow the plan for dimensions, it's drawn to scale.
The Fiddle Yard is 12 inches long, same as the Loco Lift that will operate in it.
The first turnout is exactly 5/8" from the end of the Fiddle Yard. You may want
to paint the Fiddle Yard black, as I did, just to make clear that it's "offstage".
This step isn't really necessary, however.
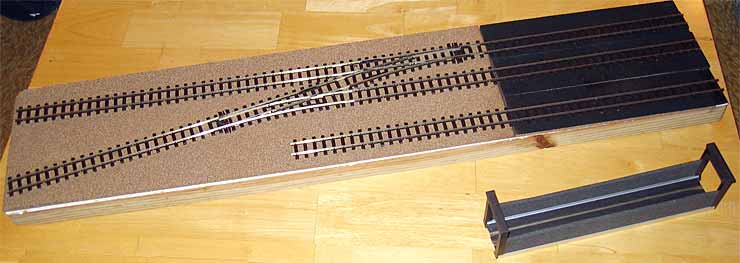
Notice that I did one other thing
-- I covered the whole baseboard with a layer of cork (bulletin-board sheeting from
a DIY store). This is to deaden the sound of wheels drumming on the hollow baseboard.
I don't know if it's necessary or not ... I just added it because it seemed like
a good idea! [Cork Cost: $9.]
ADDING THE ELECTRICALS
All we need to do before we can start running trains is to wire the layout to bring electricity
to our locomotives! Wiring the PPRR is very simple, complicated only by the need
for several feeder wires and two insulated rail joiners. This happens because the
turnouts are made with solid frogs that will short out unless properly wired. (In exchange, however, you
can virtually forget about "stalling on the frog" when you're operating at very low speeds!)
You need to arrange for electrical feeds at three places on this layout.
Notice that you need to use insulating
(plastic) rail joiners in each rail where the two turnouts meet. You can get these
at the hobby shop at the same time you get the metal joiners for the rest of your
trackage. [Joiner Cost: Metal joiners - $2. Plastic joiners - $1.]
You'll need to attach a wire to each rail at three places to wire the PPRR. If you
already have soldering skills, this is a simple chore. Just tack a wire to the base
of each rail and feed it through a tiny hole you'll punch in the baseboard (I use
an awl or an icepick for this task). If you haven't yet tried soldering, there are
several other ways to attach wires to the track.Talk to your local hobby shop or
call a shop like Caboose Hobbies. Several manufacturers make clips that will hold
wires onto the rail. Also available are wires pre-soldered to rail joiners, that
you can just pop onto the ends of the track, feeding the wires to the bottom of the
layout.
The bottom of Peek's Pike looks like this (left).
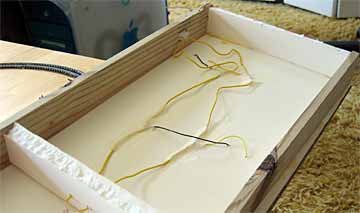 
For simplicity, I chose to run two
wire buses the length of the layout (they're the parallel wires running down the
center). They really ought to be different colors to make it simple to keep track,
but I ran out of black wire and had nothing left but yellow. There's always something...
Run the feeders from the rails to the appropriate bus, making very sure the same
rails always are attached to the same bus! You can solder these connections, or just
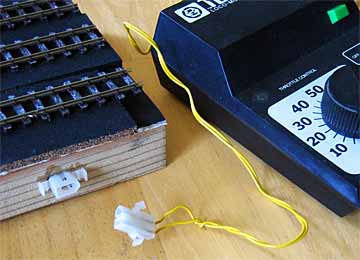
wrap the wires around the bus and tape them down. The ends of the bus feed into a
socket of your choice (at right). The connectors shown are standard Radio
Shack parts [Connector Cost: $2]. Wires can be attached to the connectors
by crimping, not requiring soldering (although it helps one's piece of mind to have
them securely soldered!). The female socket is attached to the "Variable DC"
terminals of your power pack. You can use virtually any power pack you already have
-- the excellent Bachmann locomotives we'll use for this On30 road require very little
current to glide smoothly along at slow, switching speeds.
So. Plug in your power pack, put a train on the track (or into the Loco Lift), and
run a railroad!
NOW FOR THE SCENERY
When you have some time
left over from railroading, and would like to explore more additions to Peek's
Pike, have a try at making some scenery. No two people will ever make the same
scene, even on the same track plan ... but because I designed the scenery for my
pike using a couple ideas that may be new to you, I'll tell you what I did. If any
of it interests you, please feel free to borrow!
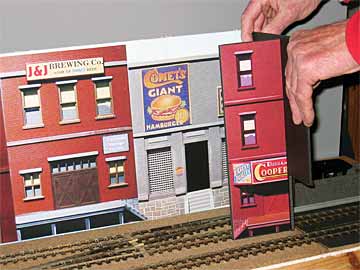
Backboards are generally very important to micro layouts, because they help
to set the scene and create a feeling of space. I was looking for a really inexpensive
background source for the PPRR, and happened across Elfin Models on the Internet. They make really excellent background buildings
for O scale -- and even better, they provide excellent photographs of their standard
designs! I shamelessly borrowed their photos, rescaled them in PhotoShop Elements
to O scale size, printed them using my computer, and pasted them side by side on
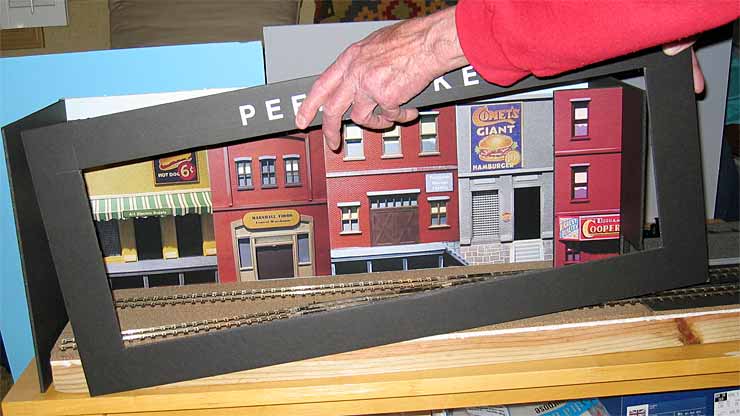
a piece of foamcore to form an O scale urban backdrop. In this photo, I'm putting
the backdrop in place, along with the lefthand end piece, which is just a plain square
of black foamcore cut to size. On my version of the pike, the backdrop is 27 inches
long.

 Next, I borrowed a trick from the theatre
and built a "tormentor" -- a projecting, flat "wing" that sticks
out from the sidelines and blocks the audience's view of part of the stage ... in
this case, it blocks their view of the two rear tracks exiting into the Fiddle Yard.
The left side of the Cooperage flat is pasted on the tormentor, making this bit of
fakery an important part of the scenery! An end-loading platform is planned for the
front siding, to serve the Cooperage (see plan above). Next, I borrowed a trick from the theatre
and built a "tormentor" -- a projecting, flat "wing" that sticks
out from the sidelines and blocks the audience's view of part of the stage ... in
this case, it blocks their view of the two rear tracks exiting into the Fiddle Yard.
The left side of the Cooperage flat is pasted on the tormentor, making this bit of
fakery an important part of the scenery! An end-loading platform is planned for the
front siding, to serve the Cooperage (see plan above).
The exit of the front siding will be hidden by the proscenium arch.
The final piece of the "staging" for this set comes next (below) as
we place a frame across the front of the stage (usually called a proscenium arch).
The frame has parallel strips of foamcore behind it that create a press fit for the
two end boards that hold it in place. One small piece of masking tape is helpful,
at the upper right rear corner, to keep the whole thing solid and stable.
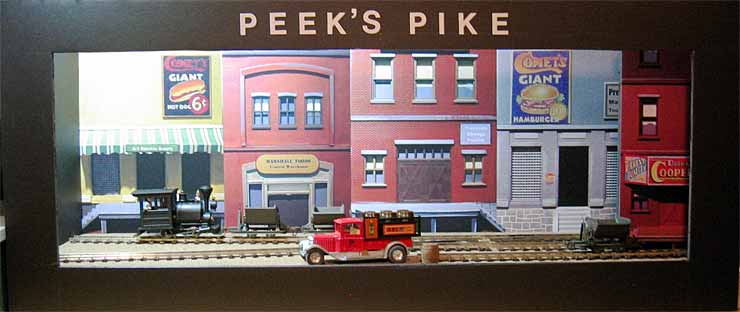
As you see, I Iettered the name of the layout on the black foamcore frame using 3/4"
vinyl press-on letters. [Optional Lettering Cost: $4.]
|