|
Mining and Quarrying
Layouts
(Page 2 of 2)
|
|
Ordinarily, you can shunt box cars or reefers wherever
you like and just declare that they are "empty" or "loaded."
One problem with mining layouts is that the mined mineral is transported in open
cars or wagons. So for realistic operation, you can't really return an obviously
loaded ore car to the mine. Yurze Ore Mine is a micro variant on John Armstrong's
classic solution to this problem, which he called "empties in, loads out,"
or vice versa.
This tiny On18 (O9) or HOn3 (OO9) road uses a hidden sector table to receive and
dispense loaded and empty cars at both ends of an ore-carrying industrial tram railroad.
A small diesel loco pulls three or four loads from the ore mine using the backstage
track, and hauls them around the bend, over the impressive trestle bridge, to the
smelter. Pulling into the runaround track, the loco moves to the rear of the train
and pushes the loads into the smelter (and back onto the "loads" track
of the sector table, which you have surreptitiously swung over). The loco picks up
a string of empties, returns to the mine, and deposits the empties in similar fashion.
Then the maneuver is repeated. Each train can make as many laps of the loop as you
wish in between deliveries, and there are lots of interesting scenic goodies to look
at along the way. If there's too much track crammed in for your taste, just use two
engines and eliminate at least one runaround track!
Yurze Ore Mine provides a perfect solution for the dilemma illustrated so well by
Armstrong -- he shows a picture of a model railroader backing a string of loaded
ore cars into the mine. Another modeler says to him, "Hey, Joe, didn't the boys
down at the smelter want the stuff after all?" That situation never arises at
Yurze Ore Mine!
|
|
Let Your Fingers Do the Shifting
Magic Fingers Mine is a small but intensively
worked producer of tintinnabulum ore, sold to rock bands to enhance the sounds they
make at concerts. The stuff is expensive and hard to extract from the ground, so
trains are limited to one or two cars at a time coming down the hill to the interchange.
A well polished 16.5mm gauge railway does the job -- in either HO, On30, or Gn15
scales.
In contrast to highly automated "Empties In, Loads Out" operations (see
Yurze Ore Mine above), this one is completely manual. The behind-the-scenes operator
lifts the loaded cars from the hidden interchange track and places them on the proper
track within the mine. He also removes empties from the mne track and places them
on the proper interchange track. Four-wheeled cars are recommended.
After delivering a couple loaded ore cars to the interchange siding, the line's small
but powerful locomotive pulls a pair of empties from the interchange track, along
with perhaps a short boxcar or gondola of mining supplies. After sorting the consist
in the tiny yard, the loco attacks the Big Hill. It's slow going, which gives the
operator a chance to exchange the appropriate cars behind the scenes.
After a switchback maneuver (a good spot to try automatic train control), the tiny
train reaches the top and shunts the mine and the mining supplies warehouse. Then,
pulling a pair of loads from the mine, it proceeds down the hill to the Interchange
tracks, to repeat the performance. While the little train is en route, the operator
once again exchanges loads and empties backstage.
It requires small ore cars and short locomotives, but you can build this authentic
ore-handling road on a four-foot bookshelf. Grades are about 7%, which nearly any
model loco can handle with ease under these light loads. Running the backstage operation
will require a little practice, but the effect on spectators can be electric!
|
|
7/8" Trains on a Shoebox Plan!
 John Dale, who lives in a village called Shepshed in the
"centre of England," is a garden railroader who decided to bring his big
trains indoors for the winter. And John's trains are really big .... 7/8n2
scale (1:13.7), which uses G-gauge trackage (45mm or 1.75 in) as two-foot gauge prototype
track! Seven-eighths of an inch represents a scale foot. John Dale, who lives in a village called Shepshed in the
"centre of England," is a garden railroader who decided to bring his big
trains indoors for the winter. And John's trains are really big .... 7/8n2
scale (1:13.7), which uses G-gauge trackage (45mm or 1.75 in) as two-foot gauge prototype
track! Seven-eighths of an inch represents a scale foot.
In order to run these giant models indoors, John decided to use a micro layout plan
-- specifically the plan of Carl's Imports
which is an HOn30 design to fit in a shoebox. Needless to say, in this Large
Scale model, the plan does not fit in a small space ... in fact, it's about nine
feet long (114x21 in or 290x54 cm)! But the plan's the same micro design, except
John has improved it in several important ways. He calls the result Defiance Mine.
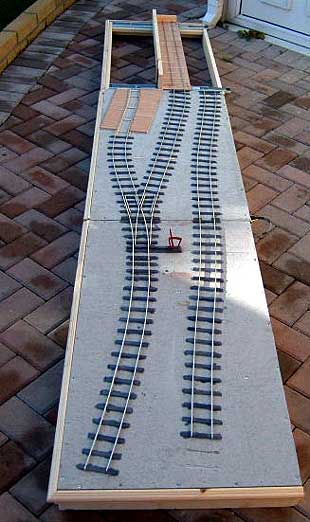
In this end view (left) the viewing side of the work-in-progress layout
is to the left. One big difference from Carl's Imports is immediately noticeable
-- the spur at the upper left has been extended through an engine shed to enter the
traverser (transfer table), which John has substituted for the sector plate of the
original design. He gains a runaround capability and considerably more flexibility
in operation by using this more complex device. (See discussion below.)
The finished railroad will haul ore from a single-chute tipple on the long spur at
the lower right, to the offstage crusher or mill reached by entering the traverser
on the middle track. Trains will use the traverser at least twice to deliver the
ore. Wagons in transit can be spotted on the middle track while the loco runs around
them via the traverser and engine shed, to be able to shove them into the mill.
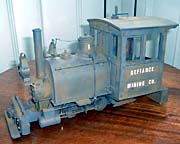
John's first 7/8" scale loco (in fact his first 1:13.7 model!) is shown at the
top. It 's the result of seeing an article in Finescale Railroader magazine
about a scratch-built 7/8" Porter on a Bachmann G scale Porter chassis.
John was hooked.
The Porter is the result -- cab is wood (mahogany), tank is from brass sheet, chimney(smoke
stack) and domes are brass turnings on his lathe. The bell and link-and-pin couplings
are from the excellent Talisman range, and the headlight is scratchbuilt. John comments,
"Considering it's on a standard Bachmann mechanism the running is very good."
|
John's traverser (transfer table) is an important element of this model, and it's
a layout feature that I get a lot of email about. So I asked John for a more detailed
look.
At right is a closeup of his traverser, made from two hardware-store drawer runners.
The deck is a spare piece of floor laminate. As long as the bracing is very sturdy,
these will give years of smooth and reliable service.
Indexing the table is handled by a spring catch (far right). |
 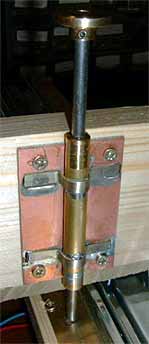 |
John's description of the spring catch construction:
"It's a length of 3/8" brass tube with a turned brass bearing (bored 3/16")
in each end.A length of 3/16" steel rod has a collar marginally less than
the diameter of the tube fixed to it. A spring fits between this and the top bearing
, and the bearings are then soldered to the tube. I turned the threads off an old
gear wheel to form the knob on the end of the rod.
"The unit is fixed to a piece of 1/16" printed circuit board ( or metal)
with 4 holes drilled for fixing. The rod is hence sprung downwards into
a 3/16" hole drilled in a strip of metal that is fixed to the base of the traverser to
locate the tracks. Pull up rod to release." Ingenious!
Although John's layout is considerably larger than most of the plans in this collection,
I think it shows the proper "Micro Spirit" -- not to mention a lot of ingenuity
-- and so I wanted to bring it to your attention. For more information about 7/8"
scale, see Steve King's website on the subject.
For some random photos of my own explorations in this wonderful, gargantuan scale,
click
here. To view another approach to large
scale adaptation of Carl's Imports in a much smaller area, see Carl's Exports.
|
|
Return
to Page 1 of "Mining and Quarrying Layouts"
|