|
Are Two Tables Better Than One?
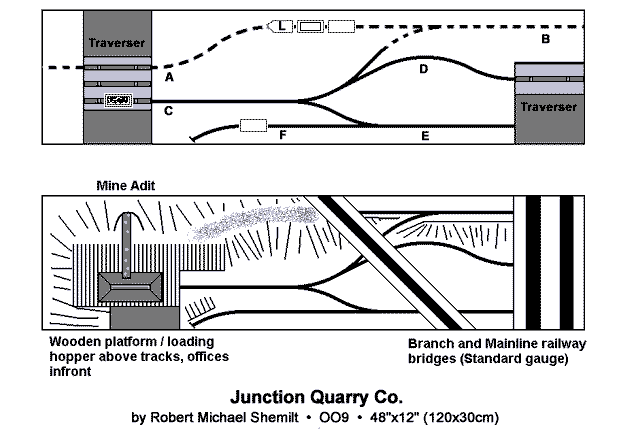
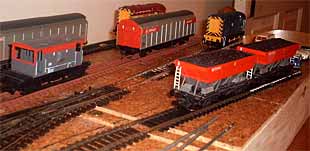
Robert Michael Shemlit has worked the traverser (transfer
table) idea for all it's worth and found a way to use one at each end of the layout!
Robert likes to doodle trackplans during dull maths lectures, and Junction Quarry
Co. came from one of those sessions. You can tell its origin...it's by far the
most elaborate "empties in - loads out" concoction I've ever seen!
The scene is a mine loader area near the junction of a mainline and branch of a standard-gauge
railroad. Limestone cliffs line the rear of the layout, and at the west end is a
mine adit with a conveyor to the hopper loading area at the front (the conveyor could
well be animated and carry a few rocks round and round forever). A tiny narrow-gauge
mining railroad serves the mine, and hauls the coal or ore away to an offstage interchange,
conveniently ducking under the standard gauge line to reach the backstage area.
The workings of this layout are a real puzzle in mathematical topology, so pay close
attention as we walk through one cycle of operations.
At the start, things are situated as shown in the top drawing. A "train"
is marshalled on Track A, hidden at the back and consisting of a tiny "feldbahn"
type locomotive, an empty four-wheel hopper wagon or skip, and a four-wheel closed
car or van, in that order. A loaded hopper or skip is spotted on the traversor beneath
the loading platform, and a closed van or covered wagon occupies Track F, next to
the office. The goal of operation is to exchange the two hidden cars for the two
on the layout and return to the hidden track with the engine leading.
The train begins operations by backing onto Track B. After throwing the turnout,
the train moves forward into view onto Track C. Then, after throwing the wye turnout,
it backs into Track E and uncouples its two cars. The loco pulls forward onto Track
C to the loading area, and couples to the loaded skip on the traverser. Reversing,
the loco backs up, pulling the skip to Track D, where it uncouples and leaves it.
Everybody with us so far?
Now the loco continues backing onto the right-hand traverser, which moves it down
to Track E. Moving forward, it couples to the two cars it originally brought in and
pushes them onto Track C -- all the way to the loading hopper, where the empty skip
is spotted on the traverser, under the loader. The loco than backs off, towing the
covered wagon or van, back to Track E and then forward onto Track F where it couples
to the waiting wagon. Reversing again, it backs to Track E then forward onto Track
C, where it uncouples the wagon it just picked up and leaves it .
Reversing again to Track E, the loco moves forward to Track F and spots the new covered
van or wagon next to the Office.Then it runs light all the way back along Track E
to the right-hand traverser, moves up to Track D and forward to couple to the loaded
skip that it previously left there (you do remember that skip, don't you?).
Pushing the skip forward to Track C, the loco couples to the covered van it had left
there, and finally staggers out of the area, back to the hidden Track B where it
reverses into hidden Track A.
Here's where the skulduggery occurs. Notice that we now have the same train as when
we began, except the car order is reversed and the skip is now loaded, rather than
empty. Our goal now is to restore the original state of the stock. Pay very close
attention now, class.
We begin by movng the traverser table to bring the empty skip up to Track A. The
loco shoves its two cars forward and pushes the empty skip onto the short stub track
at the left of the traverser. Then it returns to Track A., and the traverser is moved
down one notch. The loco shoves the covered van onto the traverser and uncouples,
returning to Track A.
The traverser is then moved upward again, bringing its bottom track even with Track
A. The loco shoves the loaded skip onto the Traverser and uncouples, returning to
Track A.The traverser is returned to its beginning position and the loco moves forward,
couples to the covered van or wagon on the stub track, and pulls it back to Track
A. The traverser moves up one notch, and the loco pushes the van/wagon onto the middle
track, coupling it to the loaded hopper that is already there. The loco returns to
Track A, ready for the final move in this bizarre gavotte.
The traverser returns to its normal position, the loco proceeds across it to the
stub track and waits there while the traverser is moved up one notch, bringing the
two cars into line with the loco. It moves onto the traverser, couples with the two
wagons, and proceeds eastward onto Track A, where it stops for a well-deserved rest.
The situation has now returned to the same configuration it had at the beginning,
and operations can begin all over again!
Got that? There'll be a quiz later. Many thanks to Robert Michael Shemilt, who maintains
a website for the Ruislip Lido Railway Society Ltd.
in the U.K., for devising this complex tour de force. If anyone actually builds
a layout like this one, please send photos if they allow cameras into your padded
cell!
|
| |
Triplication!
Chris Gilbert, who lives in the West Midlands of
England, has not only obtained a Peco three-way turnout for his next micro layout,
but he's designed three versions of the layout itseff! Here they are, Threeway
Points Mill 1, 2, and 3.
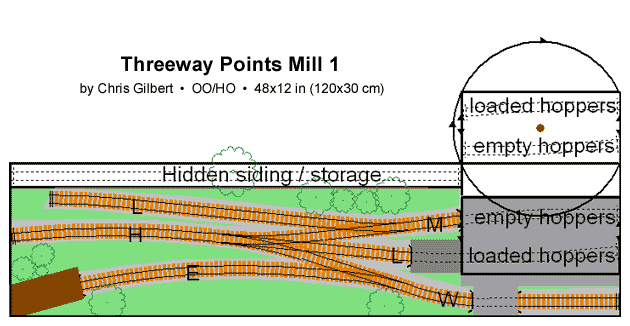
Threeway Points Mill 1 sets the theme of
a china clay hauling branch line, which delivers empty hoppers to the mill and takes
loaded ones away. Chris's initial design thought was to provide a turntable that
could turn empty cars into loaded ones. In order to get a full-length table, he figured
on a "pull-out" design, where the table could be pulled from its berth,
rotated, and returned into place with the rolling stock positions reversed. Sort
of like a reversible transfer table (traverser)!
The key to this diagram reflects the purpose of the design: to give the impression
that a mainline train brought the empty clay wagons to the works. The large train
engine is stabled at (L) (upper left); the clay works shunter (a small
08 diesel switcher) comes from its engine shed (E) to pull the empties from
(M) to the weighbridge at (W), via the head shunt (yard lead) at (H).
After being weighed, the wagons (cars) are placed on the loading track (L)
(center right). By a 180-degree rotation of the traverser/turntable, the hoppers
are converted from empties to loads, ready to be hauled away.
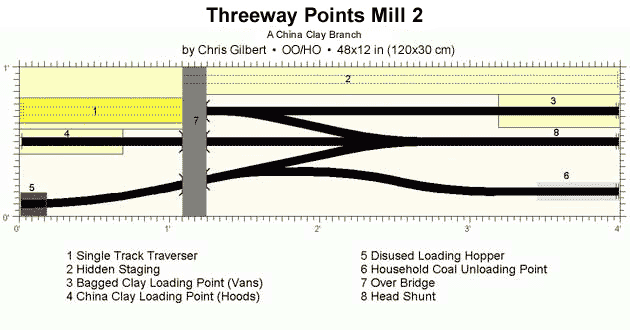
Some additional thought led to the design of Threeway
Points Mill 2, which features an actual transfer table/traverser, serving a capacious
hidden storage siding (2) and the headshunt for the mill yard (8).
Chris has dramatically increased his shunting possibilities with this design, and
he's assigned different freight destinations to each track. The focus is on china
clay handling and shipping, but there's greater diversity in this version.
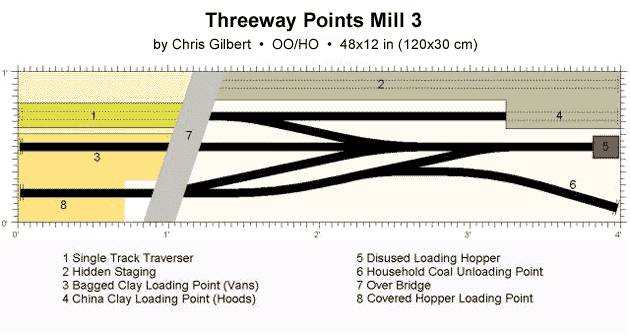
Further reflection and mocking up some of the operations
of the little layout (see photos below) suggested another design refinement.
In Threeway Points Mill 3, Chris added an on-stage runaround loop, to add
to the visible shunting activity. He still envisioned using a standard BR 08 diesel
switcher and short wagons (cars), but now the cars could be manipulated in plain
sight with less reliance on the hidden siding. Switching destinations were shuffled
a bit to suit the new configuration.
 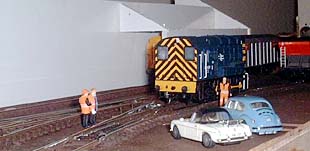
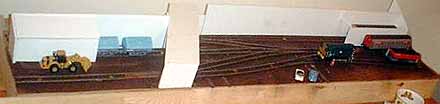 Chris has created mockups of these designs to check operating
patterns and scenic treatments. Stay tuned to see which version (if any) he actually
builds! Chris has created mockups of these designs to check operating
patterns and scenic treatments. Stay tuned to see which version (if any) he actually
builds!
|
| |
One Good Plan Deserves Another
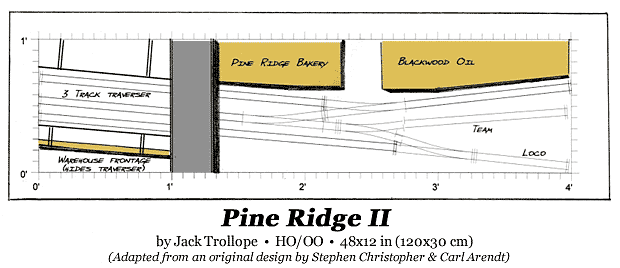
Jack Trollope was delighted with the original 1x4
foot Pine
Ridge Industrial Park plan, and realized
that a couple simple changes might make it even better to operate. The result is
Pine Ridge Industrial Park II. First he added a hidden traverser (transfer
table) at the left end, to increase the flexibility of operations, provide more spacious
runaround capabilities, and add some new switching destinations to the layout.
Jack's second change is even more dramatic -- he tilted the entire trackage a few
degrees clockwise. Not only does this stunt give a feeling of increased spaciousness
to a tiny plan, but in this case as Jack points out, "The warehouse view-block
[hiding the traverser] could have open doors with truck loading/unloading in the
front, providing more detailing opportunities."
Jack bubbled over with good ideas for this little plan: "The Highway overpass
can be jammed with stationary rush hour traffic. (I've recently seen a layout picture
with bridge traffic held up by a workman with a 'Stop/Go' board, due to road
repairs -- a neat alternative!) I'd also adjust the track spacing slightly so that
all tracks would line up. The topmost siding track (Pine Ridge Bakery) will also
allow for 'virtual' destinations further down the Industrial Park [by switching cars
into the top traverser track]."
Another advantage of this redesign: no extra cassettes or approach tracks are required.
The entire layout is contained within the four square feet of baseboard, a big advantage
if the layout is hauled around to train shows. One final improvement that Jack suggested,
even though it would take the layout out of the Micro class: "I'd also extend
the traverser by 6 inches to take a loco and two cars. Another couple of
inches would also allow the use of 50-foot cars. " He's right -- a 56-inch layout
would do a better job, especially if Modern Era rolling stock is used!
|
| |
UPDATE
Upon further consideration, Jack
has further enhanced his variation on the Pine Ridge theme ... this one is Pine
Ridge Extra, so called because there is an extra track on the traverser.
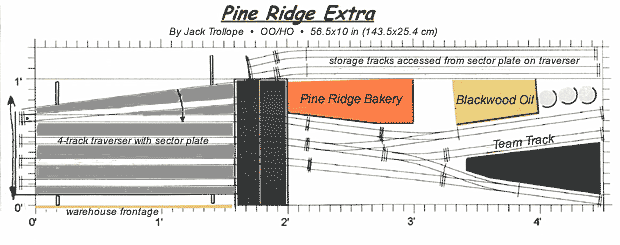
And there's a second addition, even
less conventional. Jack has placed a sector plate as the top track of the traverser
-- it not only travels back and forth with the traverser, but it pivots on its far
end, to serve two new hidden storage tracks at the back of the layout. Notice that
the visible part of the layout remains unchanged...but the fiddle yard has grown
considerably -- and added a significant amount of operating flexibility in the process!
The designer explains all these
additions this way: "Traverser track length
should be sufficient to hold a small loco (SW9/12/1500, NW2) and two 50' cars . The
traverser is fitted with stop-blocks that allow it to be moved only one track to
either side. It's also used to allow run-around moves to take place - the other switches
(pointwork) are imagineered to be farther down the track beyond the road-bridge.
"The other slightly unusual thing is that the
topmost track on the traverser is, in fact, a sector plate that can swing to access
the two hidden staging sidings at the rear of the layout, in addition to lining up
with the track in front of Pine Ridge Bakery. This allows trains to be moved on to
farther virtual industry sidings that are assumed to be on down the branch
line.
"The two storage sidings allow wagons/cars
to be left for loading or unloading and others to be brought back from those industries
that are off-stage. The lowermost track on the traverser goes to the interchange
with the main line. Alternatively, this track could be one of several removable cassettes
that mount onto the traverser."
Got that? This simple layout has
become quite complex to operate. But the reward is, the operation is much more satisfying
and realistic!
|
