|

PAGE 19 - NOVEMBER 2003, ©2003
Carl Arendt
Linked index
of all Scrapbook pages
|
|
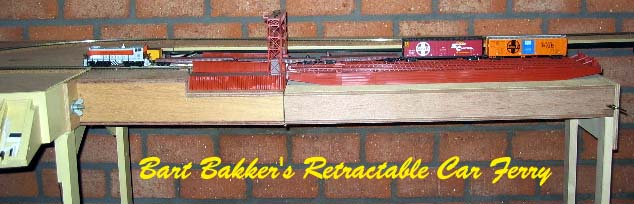
The above car ferry is being constructed
by Bart Bakker, who lives in Utrecht, Netherlands. At the left, it's a conventional
FREMO module that connects with other modules and represents a ferry apron. But the
right end is something Completely Different.
It's a Walthers car ferry, sitting on a waterway 68 cm long. It has a magical property
-- it can cross the Atlantic Ocean and carry railroad cars from the U.S. all the
way to the Netherlands and beyond! For that reason, Bart has named his module the
Atlantis Port Ferry.
Shown at the top of the page is a switching locomotive loading a pair of box cars
on the float, using three idler flat cars. Naturally, the heavy loco isn't permitted
on the floating barge!
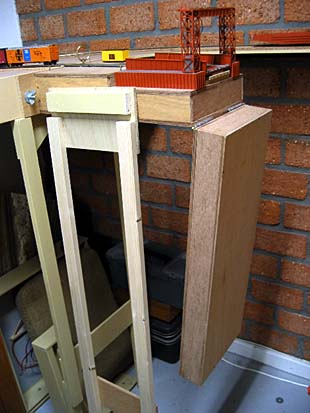
And the car ferry part of this module has another surprise in store. It was originally
designed to be used in a permanent, around-the-room layout with a docking point for
visiting FREMO modules. However, the layout's owner changed his room entrance to
eliminate the duckunder, and constructed a large bridge on wheels that is moved out
of the way when someone needs to enter or exit the room.
And guess where the only parking place for the bridge is located? Yup, right in front
of the FREMO docking position. In fact, there's only about 45 cm clearance between
the bridge and the benchwork. So Bart's ferry module is designed with a 42 cm apron
-- and a 68 cm waterway that can easily be folded out of the way when necessary!
The work-in-progress photos below show how it's done (photography by Bart Bakker):
1. Above left. Car ferry in place. Switching loco has
withdrawn.
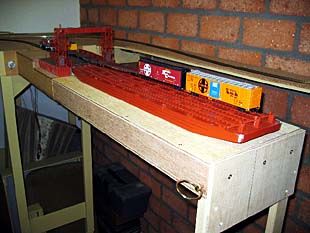
2. Above right. Ferry is lifted away and stored safely
out of harm's way.
 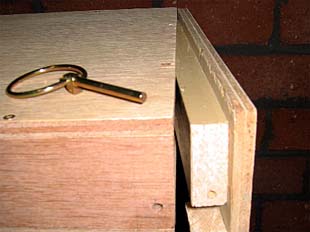
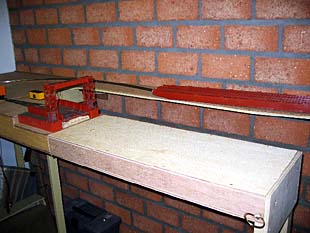
3. Above. Pin locking the leg structure in place
is pulled, and inserted in a convenient hole in the apron, blocking the entrance
turnout to the ferry.
4. Right. The "water" is swung down out of the
way, allowing the room entrance bridge to be rolled into position. Total elapsed
time: about 30 seconds.
|
|
LAYOUT UPGRADES: 1
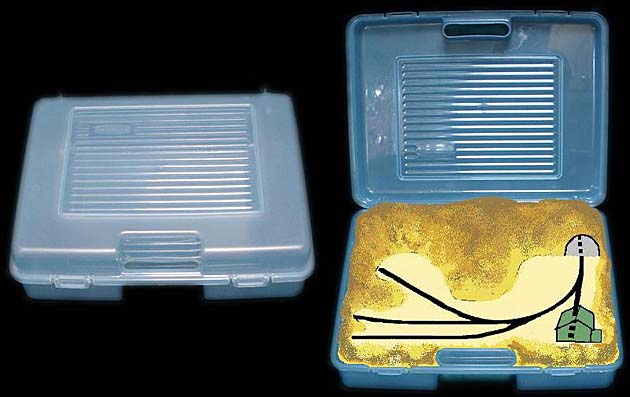
Brian Wilson, who lives in British
Columbia, Canada, spotted this Rubbermaid storage container that his wife uses for
craft supplies. It measures 22x16x6.5 in (56x41x16.5 cm). What better place to build
a micro layout?
And what better layout to use than my A3 Sized Inglenook plan? In fact, the storage box is a bit larger
than A3 size, allowing Brian to have slightly bigger curves and somewhat longer sidings.
He drew up the sketch shown here to give you the idea ... with luck we'll have photographs
soon of the finished layout! You can follow his progress at Brian's website.
|
|
LAYOUT UPGRADES: 2
In England, Alastair Inskip
has been studying my Midnight Flyer design, with an eye to using stagecraft
to change the track plan each time the flying scenery is used to change the railway's
venue. He came up with two plans to achieve this magical change: (1) Use an extra-long
baseboard with two different plans on it, and slide the board back and forth so the
audience sees the track that matches the scene being shown; OR (2) Save length by
dividing the baseboard in half lengthwise, and sliding each half to form a different
plan when the scenery changes.
As having two or more complete track layouts on a long board would double or triple
the space required for the layout, Alastair opted to experiment with the second option.
Here's his intial, very preliminary attempt at a sliding design:


It takes some study to understand this
diagram. The green box is the visible "on stage" area. Alastair has added
two feet to the layout's length, and split the baseboard in half lengthwise. Two
distinct track arrangements can be achieved by simply sliding the halves -- one resembling
a Timesaver switching game, the other an Inglenook switcher. Obviously, some more
design work is needed, but Alastair's idea is quite original. Anyone have more ideas
or comments?
|
LAYOUT UPGRADES: 3
 John Hubbard, who lives in Florida, has
come up with an interesting addition to my shoebox layout, Carl's Imports. He suggests adding a small, two-track
traverser inside the Imports building (see "doctored" image at left.) John Hubbard, who lives in Florida, has
come up with an interesting addition to my shoebox layout, Carl's Imports. He suggests adding a small, two-track
traverser inside the Imports building (see "doctored" image at left.)
Operation would be a little easier. The loco can push a car from the sector plate
into the building and uncouple. The traverser invisibly moves the car to the rear,
replacing the track with another -- whereupon the loco moves through the building.
The traverser then returns the car to the main, the loco couples on, and an easy
runaround has been achieved!
The alternative, as envisioned in the original plan, is simply to remove the car
from the track by hand to allow the loco to run through the building. John's suggestion
is packing a lot of paraphernalia into a very tiny layout -- but it looks like it
would work quite well. The same stunt could be used with passenger carriages in layouts
such as Union Station.
To see more of John's ideas, visit his website. |
|
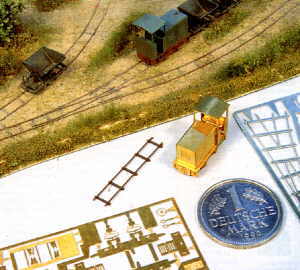
IF YOU THINK N TRAINS ARE SMALL,
MEET Nf!

Frédéric Gantier,
from France, has just completed another in his series of very small vignettes. This
one is built in Nf scale ("f" stands for "feldbahn", the German
term for small industrial or "field" tramways). The gauge of Frédéric's
layout is 3.75mm (a little over 1/8"), and it represents a 600 mm gauge (about
two-feet) mining prototype in 1:160 (N) scale.
The layout is built in an aluminum paint box measuring 200x150x50mm (8x6x2 in). Track
is from Railino, a maker of Nf European-prototype trains. Here's a photo of some
of their offerings.
 These
tiny trains are amazingly detailed. To learn more about them, there's an online catalog. These
tiny trains are amazingly detailed. To learn more about them, there's an online catalog.
Frédéric also
passed on a couple of scenery tips. The trestle is made with N country fences. The
terrain comes from an aquarium resin decoration used for simulating rocks.
M. Gantier has no website, but you can reach him by email.
|
|
Visit us often ... we'll frequently be adding pages to the Small Layout Scrapbook!
Your
are welcome!
RETURN TO HOME PAGE
|
s