|
PAGE 51 - JULY 2006, ©2006 Carl Arendt Linked index of all Scrapbook pages |
||||||
 As you might expect, we receive a lot of information that does not fit neatly into the themes used for this Scrapbook. It accumulates in the files, until we have enough material that we think is worth bringing to your attention, and then we publish an issue devoted to our collection of good STUFF. Here 'tis! |
||||||
THE SMALLEST RADIUS?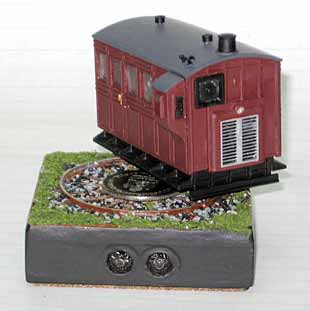 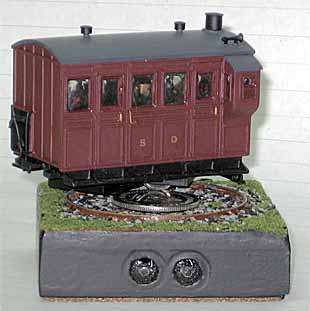 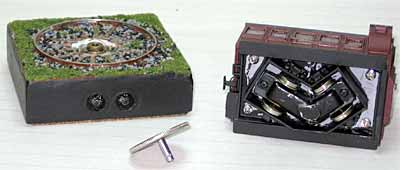 Possibly
the smallest pizza layout ever built -- and almost certainly the
smallest operating radius ever used in O scale -- was sent in by Mike Mackay, from Dartmouth, Nova Scotia, Canada. Mike explains, "The Silver Dollar Tramway is 0n30 (fairly
accurately to scale, because gauge was opened up to about
17.5 mm to handle the radius) with dimensions 3.5x3.5 inches . The
'baseboard' is a piece of 2x4 cut square. The inner track is a
promotional dollar coin, about 32 mm diameter. Since the motive
power has two solid axles -- albeit realigned as shown -- the coin is
free to turn in order to minimize wheel slippage. The carbody is
a Peco 0n16.5 coach; the power from an old diesel truck [bogie]." Wow!
Anybody have a smaller candidate (in O scale)? Possibly
the smallest pizza layout ever built -- and almost certainly the
smallest operating radius ever used in O scale -- was sent in by Mike Mackay, from Dartmouth, Nova Scotia, Canada. Mike explains, "The Silver Dollar Tramway is 0n30 (fairly
accurately to scale, because gauge was opened up to about
17.5 mm to handle the radius) with dimensions 3.5x3.5 inches . The
'baseboard' is a piece of 2x4 cut square. The inner track is a
promotional dollar coin, about 32 mm diameter. Since the motive
power has two solid axles -- albeit realigned as shown -- the coin is
free to turn in order to minimize wheel slippage. The carbody is
a Peco 0n16.5 coach; the power from an old diesel truck [bogie]." Wow!
Anybody have a smaller candidate (in O scale)? |
||||||
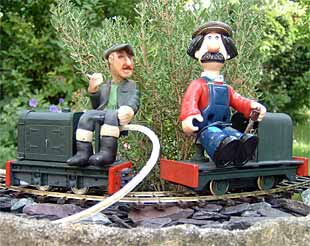
FROM OUR PAGES INTO REAL LIFE... 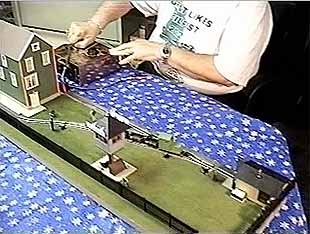 Reader Terry Bossick, from Roseville Michigan USA, not only reads this site, he does something about it! Terry signed up to give a clinic about micro layouts at his regional NMRA meeting in Michigan -- and he presented it in the form of a video that included several layouts he built from designs he found here. One of my favorites is Terry's version of the Park Terrace Railway, a fictional backyard railway that Chris Gilbert, in Mansfield England, designed to fit with his house. Terry's delightful version of this little line is shown above in two frames from the video. In the video, Terry spends a minute or so on camera, happily running the little train back and forth on this On15 (O scale on 9mm gauge) shelf line. |
||||||
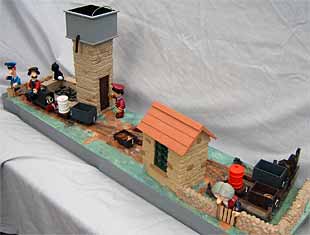
HOW THINGS CHANGE FROM DESIGNING TO BUILDING!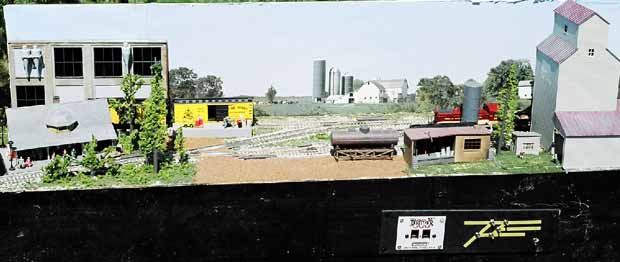 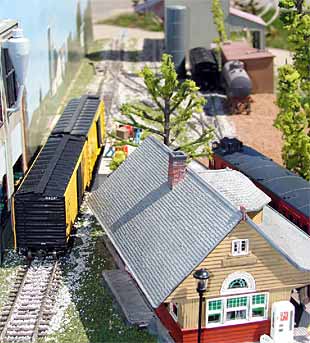 A very nice shelf layout design is Pine Ridge by Canadian Stephen Christopher. The design originally appeared on this site as a CN branchline terminus located in northern Ontario. It's even featured in my new book [shameless plug - it's on page 10] along with a couple provocative variations from the fertile mind of Jack Trollope. A very nice shelf layout design is Pine Ridge by Canadian Stephen Christopher. The design originally appeared on this site as a CN branchline terminus located in northern Ontario. It's even featured in my new book [shameless plug - it's on page 10] along with a couple provocative variations from the fertile mind of Jack Trollope.But as often happens, Stephen changed things in the course of building the layout. The "as built" design is shown in these two photos, and the plan is clearly visible on the control panel in the top photo. It's a very nice switching layout -- and quite different from his original design! We featured Stephen's new design as a work in progress in Scrapbook #42 -- and here are some up-to-date photos of the nice-looking finished layout. |
||||||
| TOYS? OR RAW MATERIALS FOR MODEL RAILROADING? We've received several items lately from folks who are using "toy" materials to create interesting small operating layouts. They provide a good example of what Vane Jones used to call, "The fundamental technique for good modeling -- scrounge!" Take a look...  Gary Chapman,
from Newark Valley, New York USA, converted an XTS Train System toy
battery powered railroad into an operating HOn30 logging line, the Rex Lumber Company. The
XTS modular toy train sets use interlocking 6x6in modules with a
track gauge of 9mm (N gauge), perfect for HO narrow gauge.
Gary explains, "Three modules are complete -- a cut over with Woodland scenic stumps, an outdoor engine terminal with Woodland oil tanks and a log landing with a modified Hallmark Christmas tree ornament tractor. Ground cover is a ready mix joint compound and sawdust mix (I'm a carpenter). The logs are from my yard, and the loco and flat are modified from the XTS equipment. The complete layout is 18x6in. I plan to add a fourth module with a small gold mine." And Gary concludes with a comment made by many people who build their first small layout: "Very happy I found the micro layout concept. Finally a finished layout!" 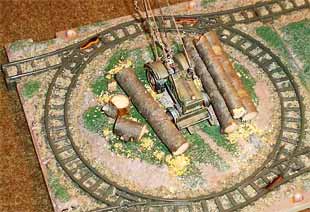 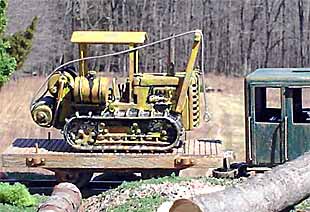 Bob Hughes,
from Sandbach, Cheshire England, used a "toy" technique to animate a
tiny N-scale layout without using a motor. He calls it "puppet
strings," and he developed it first for a 19x4in N scale display layout
called Schläfrigetal. The train is powered by a loop of
fishing line tied to the railcar underframe and looped through the ends
on the layout and out of sight round the back, so there is no need for
an electrical supply. As a result the layout is truly portable and can
be used literally anywhere!
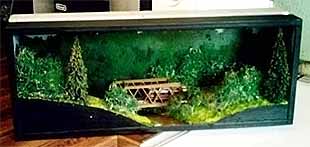  Bob explains, "Schläfrigetal?
It is German for 'Sleepy Valley,' for no better reason than that I
liked the name (and happened to have a German VT135 railcar with a
burnt out motor)." Bob also liked the puppet strings technique so much
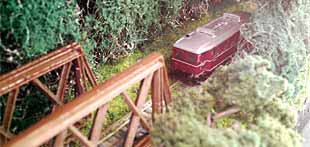
that he adapted it to his 23x7in Gn15 exhibition layout, Hayfinch.
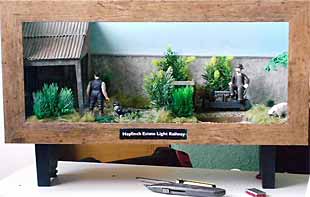 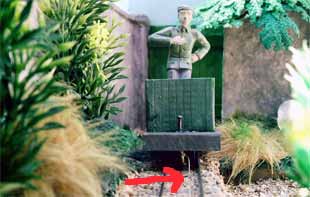 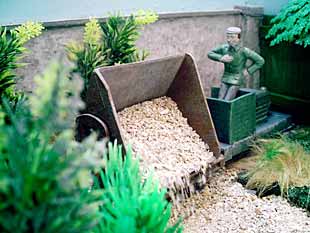 Hayfinch
consists of a length of straight track and uses a picture frame to
focus attention on the railway. The line hauls gravel from the crusher
at left to the tip at right, and cars are visibly loaded and unloaded
at opposite ends. Hayfinch can be operated conventionally, with
motorized locomotives, or in "unplugged" mode using horizontal puppet
strings (fishing line) to pull unpowered locos. The "puppetised" loco
is shown above at right. Bob points out that this arrangement allows
him to operate Hayfinch while also running another layout at an exhibition -- and he only needs bring one electrical controller. Hayfinch
consists of a length of straight track and uses a picture frame to
focus attention on the railway. The line hauls gravel from the crusher
at left to the tip at right, and cars are visibly loaded and unloaded
at opposite ends. Hayfinch can be operated conventionally, with
motorized locomotives, or in "unplugged" mode using horizontal puppet
strings (fishing line) to pull unpowered locos. The "puppetised" loco
is shown above at right. Bob points out that this arrangement allows
him to operate Hayfinch while also running another layout at an exhibition -- and he only needs bring one electrical controller. Peter Laband, from Redditch, England, found another creative way to use "toy" products on his industrial 15-inch gauge line. It's a small Inglenook style layout, built on an 8x34in bookshelf in Peter's home office. Peter uses 16mm scale and 16.5mm gauge (same width as OO and HO). 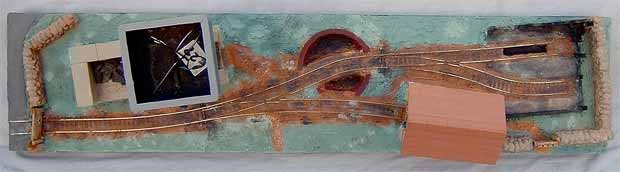 I
like the way Peter's track curves and davoids parallel lines. He uses link and pin
couplings, so has no problems about couplers mating on curves and such.
Stock is almost entirely Gn15 kits from Sidelines Models. Peter has two
locomotives, and he encountered problems in electrical continuity due to
the short wheelbases of the Tenshodo Spud motor units. He solved the
problem in what to me seems to be a unique way; "I built a simple battery box --
four rechargeable pen cells (AA), a switch to reverse direction, and a
push button to GO. No speed control was needed on just four
cells. A simple umbilical [runs] from the loco to the box, and it
works very well...So now I have a very reliable and fun layout. I
do not have to worry about cleaning the track, just press the button and the train goes every time."
  About
the figures: "I saw a 'Postman Pat' figure set in the shop. This
is a children's TV cartoon character about a postman and his pet cat.
They looked fun and were reasonably cheap. Adds something to
the proceedings to have people about."
 And
finally, about operations: "I use six wagons with the game to make a
three car works special train, chosen by rolling 3 four sided wooden
"dice"... Letters or numbers on the dice indicate what the train will
be, e.g. R=red barrel, 3=3 plank wagon, F=flat. Each wagon
appears twice on the dice, and if you do get a 'double' one of the dice
is rolled again. In addition to this I am not allowed to leave any
stock on the siding in front of the loco shed/tool store/office in case
access is needed later in the day -- and this adds a nice bit of
complexity to the game!" And
finally, about operations: "I use six wagons with the game to make a
three car works special train, chosen by rolling 3 four sided wooden
"dice"... Letters or numbers on the dice indicate what the train will
be, e.g. R=red barrel, 3=3 plank wagon, F=flat. Each wagon
appears twice on the dice, and if you do get a 'double' one of the dice
is rolled again. In addition to this I am not allowed to leave any
stock on the siding in front of the loco shed/tool store/office in case
access is needed later in the day -- and this adds a nice bit of
complexity to the game!" Ed Note: Sounds like a lot of fun to me! |
||||||
SPEAKING OF INGLENOOKS... HERE ARE TWO MORE! This S-scale Inglenook was built on 108x12in benchwork left over from an On30 portable layout, by Charles Malinowski, from Carmel, Indiana USA. He calls it his 'Singlenook.' This S-scale Inglenook was built on 108x12in benchwork left over from an On30 portable layout, by Charles Malinowski, from Carmel, Indiana USA. He calls it his 'Singlenook.'Charles comments: "I used BK Engineering turnouts, Tomalco flex track and Caboose ground-throws (HO) all mounted on a 12x48in section of Homasote. The base benchwork is the recycled staging yard from my On30 portable layout mounted on cantilevers to the basement stud wall. I find the 'puzzle' challenge a refreshing change from my HO Timesaver that I built a couple of years ago. Already I have spent (misspent?) many happy hours working the yard!"   And this HO-scale Inglenook was built by Sean Sunley, from Werribee, Australia. Sean describes it this way: "It is built on a 5ft x 8in plank. The long modern style wagons are not ideal for a micro-layout but they fit and are the same as I use on the club layout. The points are medium radius which again suits the wagons but not a micro layout." That said, Sean has built a good looking 4-2-2 Inglenook railway! Technical note: Sean does not have a digital camera, so he took these photos with his telephone! Not bad looking, I'd say. |
||||||
AND WHILE WE'RE TALKING ABOUT SWITCHING GAMES... From ever-inventive Jack Trollope, who lives in the Highlands of Northern
Scotland, comes this switching game/puzzle. Jack explains,
"The objective is to swap each car in the train for one of the
same colour in the sidings, but reassemble the outbound train
in the opposite order. As far as I can see this idea will work
and keep the operator occupied for quite a while!" Anyone want to try it?
|
||||||
HERE'S A MODEL SHORT LINE IN N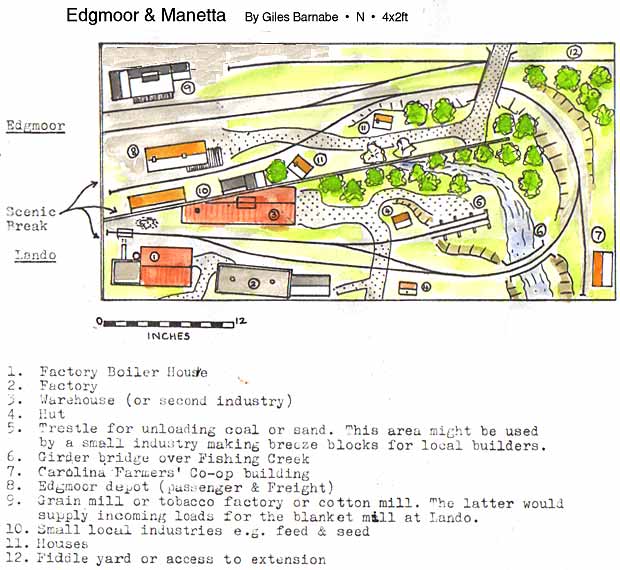 This carefully planned small layout was designed by Giles Barnabe, from London, England. Says Giles, "As soon as I read Jim Boyd's article on the Edgmoor & Manetta in
the RMC for March 1972 I was hooked; though I've never managed to model
it yet I've produced shelf-layout designs as well as this 4x2ft in N
gauge (if you wanted to do it in H0 you'd need 8x4ft I guess). As
I've altered reality a little and made up the details of the junction
at Edgmoor, perhaps I'd better call it the Edgmore & Lando, to avoid
annoying the purists. As drawn the main line lead is a little
short. To extend it you could have a drop-down hinged extension that
only gets raised to the horizontal for operating sessions."
|
||||||
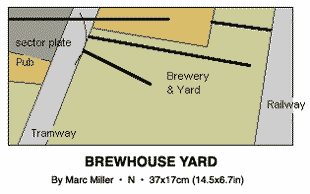
SHOEBOX LAYOUT A-BUILDING IN N Inspired by this website, Marc Miller, from Tyne & Wear, England, is building Brewhouse Yard,
an N scale shoebox layout set in the Edwardian era (early 20th
century). Marc comments, "The size of the layout is 37x17cm.
I've been building it for about six or seven months and it's not yet
finished, as you will see from the attached photos. The trackplan
is basically a sector plate serving three sidings. I've had great
fun building this especially as I can sit it on my lap and do
some modelling while watching TV. True armchair modelling!" I
particularly like Marc's busy tramway overpass (lower right).
  |
||||||
SPECIAL TREAT: SOME FINE JAPANESE SCENIC MODELING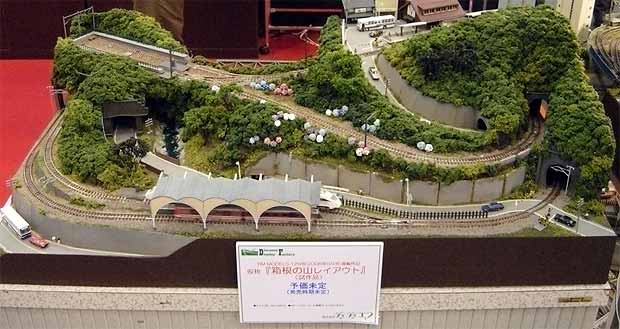 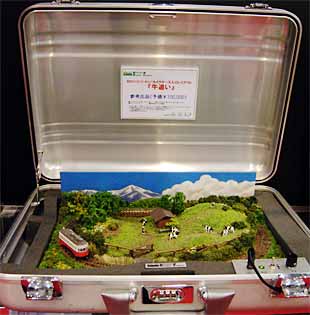 Our Japanese Correspondent, Hiromi Masaki, sent along these photos taken recently at the Shizuoka Hobby Show 2006,
one of Japan's largest hobby exhibitions. These elegantly turned out
small layouts, mostly built in N scale, are commercial products of a
company named Diorama Display Factory. According to the signs in the photos, the cost of each is around 80,000 to 100,000 yen -- about $700-$900 U.S. dollars. Our Japanese Correspondent, Hiromi Masaki, sent along these photos taken recently at the Shizuoka Hobby Show 2006,
one of Japan's largest hobby exhibitions. These elegantly turned out
small layouts, mostly built in N scale, are commercial products of a
company named Diorama Display Factory. According to the signs in the photos, the cost of each is around 80,000 to 100,000 yen -- about $700-$900 U.S. dollars.Although not many of us will be in the market for one of these little gems, Hiromi points out that we can learn much and take inspiration from these well-done small layouts. "These are good references for our modeling," says Hiromi, "because [they are] nice reductions of the prototype." So we'll finish off this month's Scrapbook page with some more photos of delightful scenic modeling from Japan. Domo arigato, Masaki san! 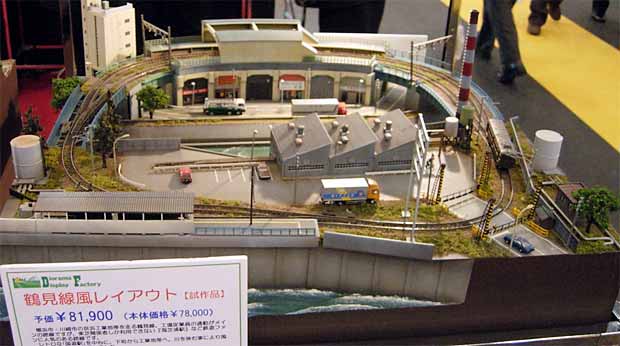 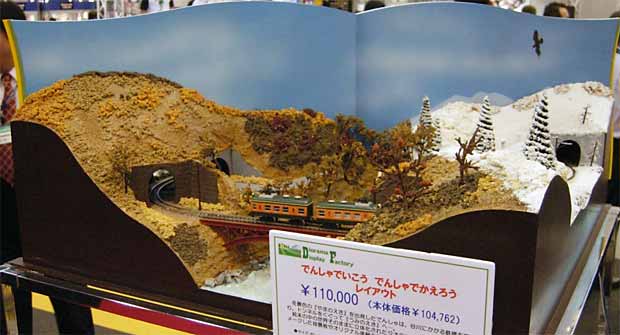 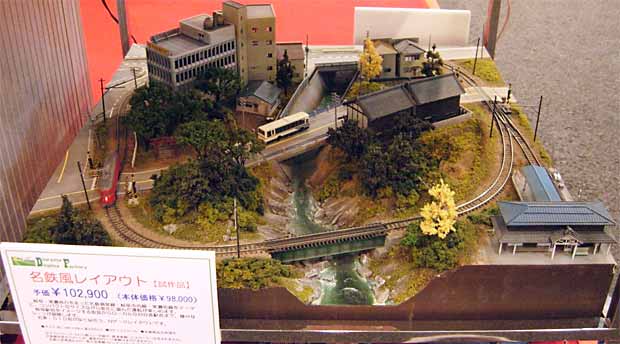 |
||||||
|
||||||