|
PAGE 52 - AUGUST 2006, ©2006 Carl Arendt Linked index of all Scrapbook pages |
||||||
 While prowling through past issues of this Scrapbook, looking for items to feature in the "Not Quite a Blog" issue (#50), I noticed several recurring patterns in the small layout designs shown over the last four years of publication. Being a pattern person, I tried to capture them on paper ... the essential elements of design in each layout -- the Layout Schematics, so to speak. There are surprisingly few! Here they are. These are the basic track patterns you can use to design a small layout that wll give you satisfying operation as well as good scenery and fun in building. If you can think of any other small-layout schematics, I'd like to hear from you. To begin with, there are two basic types of small layouts: Continuous and End-to-End. |
||||||
| CONTINUOUS LAYOUTS The Tireless Performers  C1. The Endless Loop The simplest possible continuous layout schematic also happens to be the world's most popular design -- the Endless Loop, which in its simplest form we call the "Pizza". Perfect for hobby displays and model exhibitions, the trains tirelessly chug around this circuit, passing through the scene as often as we wish. Notice that this schematic applies even if the track circles the baseboard two or more times. 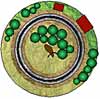 The hollow rectangle indicates a center of attention--a station, a major industry, or a landmark. In issue #31 one focus is a large model moose, in Jon Songøygard's Moose Steak Pizza! The hollow rectangle indicates a center of attention--a station, a major industry, or a landmark. In issue #31 one focus is a large model moose, in Jon Songøygard's Moose Steak Pizza! 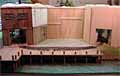 Many modelers will insert a view block across the center (indicated
here by a blue line). View blocks range from an actual backboard to a
row of buildings or trees, a cliff, and many other ingenious methods. In #49, Tad Dowdy uses a double-sided backdrop -- a cliff on one side, and wharf warehouses on the other.
Many modelers will insert a view block across the center (indicated
here by a blue line). View blocks range from an actual backboard to a
row of buildings or trees, a cliff, and many other ingenious methods. In #49, Tad Dowdy uses a double-sided backdrop -- a cliff on one side, and wharf warehouses on the other.As in Tad's case the opposite side might be another center of attention or, as indicated above by the blue rectangle, a backstage fiddle yard where train consists are adjusted and cars are added or removed from the layout. There are several good examples of viewblocking and hidden fiddles in #37. 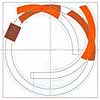 Of course, the track need not be a perfect circle, and one can add spurs for switching anywhere on the circumference. An ingenious example is François Meunier's Les Cimes in #49,
where several segments of the pizza circle are actually sector plates
that rotate to connect with sidings inside the circle. Turnouts for
stub spurs can also be added anywhere, without affecting the basic
schematic.
Of course, the track need not be a perfect circle, and one can add spurs for switching anywhere on the circumference. An ingenious example is François Meunier's Les Cimes in #49,
where several segments of the pizza circle are actually sector plates
that rotate to connect with sidings inside the circle. Turnouts for
stub spurs can also be added anywhere, without affecting the basic
schematic. |
||||||
 C2. Getting the Runaround We can add complexity by inserting a runaround siding, called in the U.S. a "passing siding" and in the U.K. a "runaround loop." This extremely popular design allows a single locomotive to handle switching chores in sidings facing both directions, located at the runaround siding or along the line. Add spurs to taste! 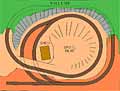 A good example of this schematic in #44a is Steve Holland's South Arpafeelie Mining Co.,
which is a compact twice-around layout with a single runaround siding.
(The schematic plan is unaffected by the number of times the line
circumnavigates the baseboard.) A good example of this schematic in #44a is Steve Holland's South Arpafeelie Mining Co.,
which is a compact twice-around layout with a single runaround siding.
(The schematic plan is unaffected by the number of times the line
circumnavigates the baseboard.)Trains often originate in a backstage fiddle yard on the other side of the oval, as shown in blue on this schematic. The visible switching area can represent a small town station, an industrial park, a single large factory, a mine, a quarry, or whatever else you can dream up! |
||||||
 C3. Round and Round and Up The next
advance in complexity is to add a branch line to the basic oval with
runaround siding. Most often, this branch runs up and over, as shown
here; but there's no reason why it can't run down and duck under -- as
if it were a branch from a mountain line that ducks down to serve a
seashore industry.
 Notice that John Allen's original twice-around Gorre & Daphetid RR as well as Frary & Hayden's Elk River Line (both shown in #4)
follow this schematic. It's extremely popular, and justifiably so--it
provides remarkably good operation in a very small space! Notice that John Allen's original twice-around Gorre & Daphetid RR as well as Frary & Hayden's Elk River Line (both shown in #4)
follow this schematic. It's extremely popular, and justifiably so--it
provides remarkably good operation in a very small space! |
||||||
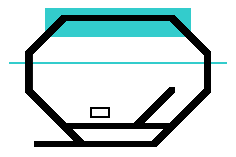
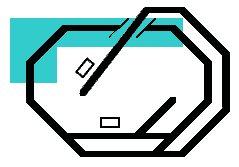
 C4. The Wyes Guy Perhaps the most complex schematic possible in a small layout (under 4x6ft or 120x180cm) is this one, The Wyes Guy. It adds a branch line, reached by a wye track formation (a "delta" in Britain). The branch can lead to another station, an industrial location, or even (as indicated here) a backstage fiddle yard.  A good example is
Jonathon Scott's Z-scale line in a suitcase, described in #34. Jonathon has added a return loop (balloon) at the end of the branch line to streamline operations. This
basic schematic enables very sophisticated operations, as well as a choice of continuous or out-and-back train routing. A good example is
Jonathon Scott's Z-scale line in a suitcase, described in #34. Jonathon has added a return loop (balloon) at the end of the branch line to streamline operations. This
basic schematic enables very sophisticated operations, as well as a choice of continuous or out-and-back train routing.
|
||||||
| END-TO-END LAYOUTS For Endless Switching Action  E1. The Here to There RR Here to There is the classic point-to-point layout. In
its simplest form, this layout schematic can be a single length of
track with no turnouts or sidings. This is perhaps the smallest possible operating layout schematic!
 Examples abound, from my tiny El Dorito Mine (and others on the same page) to such G-scale lines as Bob Hughes's Green End Quarry in #41.
Admittedly, some rather special planning is required to provide shunting
opportunities in such simple layouts -- but there are many
possibilities. Examples abound, from my tiny El Dorito Mine (and others on the same page) to such G-scale lines as Bob Hughes's Green End Quarry in #41.
Admittedly, some rather special planning is required to provide shunting
opportunities in such simple layouts -- but there are many
possibilities.  In
more elaborate designs, the visible station can have additional spurs for
switching. Just one spur is shown in our schematic drawing, and Chris
Ellis has dubbed this special case "The Fork" -- there are several good
examples in #44. A classic version is Bernard Junk's Quarry Line, shown in #4. For an extremely compact switching pike, this schematic is hard to beat. In
more elaborate designs, the visible station can have additional spurs for
switching. Just one spur is shown in our schematic drawing, and Chris
Ellis has dubbed this special case "The Fork" -- there are several good
examples in #44. A classic version is Bernard Junk's Quarry Line, shown in #4. For an extremely compact switching pike, this schematic is hard to beat.  Adding
a second spur leads to the famous Inglenook design for switching games.
This pattern is discussed thoroughly at several places on this site,
including the Micro Layout Gallery and Scrapbooks #38, #44 and #51.
And of course, adding a runaround siding at one end, along with spurs
for shunting, yields the classic British terminus-to-fiddle-yard
arrangement. Adding
a second spur leads to the famous Inglenook design for switching games.
This pattern is discussed thoroughly at several places on this site,
including the Micro Layout Gallery and Scrapbooks #38, #44 and #51.
And of course, adding a runaround siding at one end, along with spurs
for shunting, yields the classic British terminus-to-fiddle-yard
arrangement. 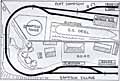 Note that the opposite end
of the line, shown in blue, may be a fiddle track or yard, or may be
another station (a true point-to-point schematic)! A good, small example of the latter is Graham Watling's Sampson Vale layout in #41.
Note that the opposite end
of the line, shown in blue, may be a fiddle track or yard, or may be
another station (a true point-to-point schematic)! A good, small example of the latter is Graham Watling's Sampson Vale layout in #41. |
||||||
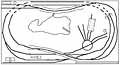
 E2. Passing Through This variation of the Here to There schematic puts the visible station in
the center of the line, between two hidden fiddle yards. Trains can run
through the scene to the other side and back again (after some
fiddling). Pausing to switch cars at the midpoint provides lots of
operating possibilities, and scheduled timetable "meets" are available
in this option.
 Needless
to say, additional stations could be added in place of the fiddle yard
at either end (or both ends!), producing a complete and workable
railway line (and possibly growing beyond the limits of small layout
design!). There are a number of good, smallish examples of this type of
design in #49a as well as in #46. Chris O'Donoghue's Nottery Quay is shown here. Needless
to say, additional stations could be added in place of the fiddle yard
at either end (or both ends!), producing a complete and workable
railway line (and possibly growing beyond the limits of small layout
design!). There are a number of good, smallish examples of this type of
design in #49a as well as in #46. Chris O'Donoghue's Nottery Quay is shown here. |
||||||
 E3. Fiddle in the Middle Just
the opposite of E2 is the schematic where the middle is hidden (perhaps
housing a fiddle yard) and each end has a station. This can be a
very interesting operating pattern if the fiddle yard is complex enough
to furnish a variety of trains in both directions.
|
||||||
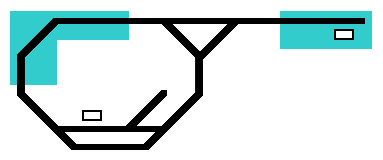
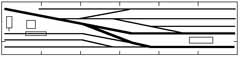
 E4. To and Fro This
schematic is the classic switchback [zig-zag] arrangement. Without the
dotted spur, it's a Fork pattern (E1); and with the spur, trains can
travel a route from the fiddle yard to the station on the dotted line
by backing and filling. The To and Fro switchback pattern provides a
somewhat longer mainline run between stations at opposite ends of a very small space.
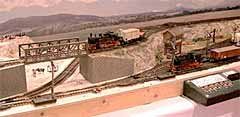 The best-known example is Chuck Yungkurth's Gum Stump & Snowshoe RR, shown in #4 and featured with several variations in #38a.
This classic layout plan climbs from a low-level terminus to a higher
level station via a switchback arrangement that includes a very
attractive overbridge. Ignacio O'Callaghan's version is shown here. The best-known example is Chuck Yungkurth's Gum Stump & Snowshoe RR, shown in #4 and featured with several variations in #38a.
This classic layout plan climbs from a low-level terminus to a higher
level station via a switchback arrangement that includes a very
attractive overbridge. Ignacio O'Callaghan's version is shown here. |
||||||
 E5. All Yard Finally,
this "shelf switcher full of track" can provide a large amount of
shunting fun in the space of a bookshelf. There are many possible track arrangements for the All Yard layout,
but most of them are variations of one sort or another on the schematic
shown. A fiddle yard is often included (indicated in blue), but is not
essential for good operation.
 The grandaddy of nearly all
these layouts is Linn Westcott's Switchman's Nightmare, shown in #4 along with John Allen's Timesaver and C. J. Freezer's Minories -- the latter two being good examples of variations within the schematic. Jack Trollope's classic Box Street Yard is another good example. The grandaddy of nearly all
these layouts is Linn Westcott's Switchman's Nightmare, shown in #4 along with John Allen's Timesaver and C. J. Freezer's Minories -- the latter two being good examples of variations within the schematic. Jack Trollope's classic Box Street Yard is another good example. |
||||||
| IN SUMMARY In a nutshell, those are the basic schematics I've found underlying the minimum-space layouts I've seen (and there are over 600 of them on this site!). These diagrams should be very useful when you sit down with a blank sheet of paper to begin designing your next small layout. Here are the possible types of track arrangements that will give you satisfying operation of the kind that best suits you. Different people will favor different approaches, which speaks well for the future of minimum-space layout design. You can have some fun with this idea by paging through the past issues of Small Layout Scrapbook, archived on this site and indexed here. See if you can spot which of the schematics is used in each layout design, and what the designer has done to amplify or distort the schematic idea in order to enhance good operations in a specific track plan. You should end up with a hatful of ideas for your next small layout! Carl Arendt 26 July 2006 |
||||||
|
||||||